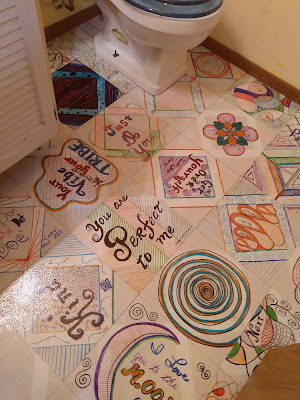
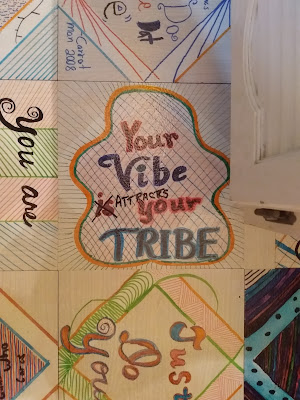
First -- the bathroom.
I would highly recommend this project for anybody looking for a cheap and easy way to change out an old tile floor. The Floor Pops go right over your existing tile -- and they have this glue thing FIGURED OUT.
We spent a coupla interesting weeks decorating the tiles. Mostly, we did this in the living room, as we were watching tv. I had a big selection of permanent markers...and every tile was completely different. The whole point was NO matchy-matchy....and I wanted WORDS on the tiles.
Before actually laying the new floor, we had to decide whether you should be able to read the words when you walk into the room? Or when you are sitting on the toilet? Lilly was adamant that they should face in all different directions...totally random...
So -- that was our plan. To basically have NO PLAN.
| The room is small, so there are only about a dozen tiles that won't have to be cut or trimmed. We picked out some of our favorites and did a dry-layout to see how it would look. . |
| I used a hair dryer to warm the back of the tile...to make the glue gooey...then, we peeled off the backer paper and placed the tile... |
| After putting it in position -- Lilly rolled each tile with a rolling pin... |
| You can see the paint job in this room -- and a bit of the window treatment. |
 |
| There was no rhyme or reason to how we laid the tiles. |
 |
| The shower curtain says, "It Is What It Is" |
 |
| This is the finished floor -- before the final coat of varnish. |
 |
| We decided to leave one plain tile right at the doorway. |
The kids and I went to a hardware store, and after carefully studying all the options -- there was a quick-drying water-based varnish (which I thought would be best).
But I bought the wrong can, which I didn't realize until after I used it, and was trying to clean the brush. Ugh. It was NOT water-based, and it was NOT quick-drying...and it DID dissolve some of the marker art.
There was nothing I could do except STAY OUT OF THAT ROOM -- it took DAYS.. TO DRY...and then, it was tacky for over a week...ugh...
However -- at some point, I decided to accept my mistakes...hold my breath....and give myself extra bonus points for being so damned artsy...


No comments:
Post a Comment